Linux容器——那些你不知道的事

0x00 前言

容器是指一种系统级的虚拟化技术,想比于KVM等内核级的虚拟化技术,具有更加轻量的特点。随着Docker技术以及k8s容器编排引擎的流行,容器在云原生时代扮演着绝对重要的角色。但事实上,容器技术自从Unix时代就已经出现,并且存在着多种容器方案,不同的容器方案之间既有相同点,也有不同点。

0x01 最早的容器化技术——chroot

最早的容器是1979年由UNIX实现的Chroot Jail。通过chroot技术,实现了独立的系统目录结构,从而支持运行指定的操作系统。

$ wget https://mirrors.tuna.tsinghua.edu.cn/ubuntu-cdimage/ubuntu-base/releases/20.04.3/release/ubuntu-base-20.04.3-base-amd64.tar.gz
$ tar zxvf ubuntu-base-20.04.3-base-amd64.tar.gz
$ sudo mount -o bind /proc proc
$ sudo mount -o bind /dev dev
$ sudo mount -o bind /etc/resolv.conf etc/resolv.conf
$ sudo chroot .
# cat /etc/lsb-release
DISTRIB_ID=Ubuntu
DISTRIB_RELEASE=20.04
DISTRIB_CODENAME=focal
DISTRIB_DESCRIPTION="Ubuntu 20.04.3 LTS"

此时,就进入了Ubuntu 2004的环境,不过这是一个只进行了文件系统隔离的容器,没有做进程、网络、资源等隔离,安全性较差,对于本地使用倒是足够了。

相对于Docker,这种方式在容器内的操作会保存到文件系统,因此退出以后再次进入还会保留之前的状态。可以使用这种方式来管理多个非临时容器环境(例如本地的多个测试环境)。

获取系统镜像压缩包

除了直接使用操作系统提供的压缩包,还可以通过docker获取,这种方式会更简单通用。

$ sudo docker run -it ubuntu:20.04 bash
root@762063502a65:/# apt update
root@762063502a65:/# apt install curl
$ sudo docker container export 762063502a65 -o ubuntu20.04.tar
$ tar xvf ubuntu20.04.tar

这里可以先对镜像做一些操作,然后再导出成压缩包。

proot

proot是一款用户空间的chrootmountbinfmt_miscbinfmt_misc实现。它可以在非root场景下代替chroot,因此在Android等不方便root的设备上应用比较广泛。

proot利用ptrace去拦截子进程中的系统调用,从而达到替换系统调用结果的目的。但这种方式也会产生一定的性能损耗。

$ proot -r ./ubuntu-20.04.3 -b /proc:/proc cat /etc/lsb-release
proot info: default working directory is now "/"
DISTRIB_ID=Ubuntu
DISTRIB_RELEASE=20.04
DISTRIB_CODENAME=focal
DISTRIB_DESCRIPTION="Ubuntu 20.04.3 LTS"

0x02 Linux资源隔离方案——Namespace

chroot容器只是实现了容器最基本的功能,支持了文件系统的隔离,但是其它资源,像进程、用户、网络这些都是与宿主机共享的。

为了支持资源隔离,Linux提供了Namespace(命名空间)解决方案。PID, IPC, Network等系统资源不再是全局性的,而是属于某个特定的Namespace。不同命名空间下的进程只能访问当前命名空间内的资源,无法访问其它命名空间里的资源,从而做到了资源隔离。

可以使用unshare命令创建新的命名空间,基本原理是在创建子进程的时候加入了对应的命名空间标记位,源代码地址为:https://github.com/util-linux/util-linux/blob/master/sys-utils/unshare.c。下面是该命令的使用帮助:

$ unshare --help

Usage:
 unshare [options] [<program> [<argument>...]]

Run a program with some namespaces unshared from the parent.

Options:
 -m, --mount[=<file>]      unshare mounts namespace
 -u, --uts[=<file>]        unshare UTS namespace (hostname etc)
 -i, --ipc[=<file>]        unshare System V IPC namespace
 -n, --net[=<file>]        unshare network namespace
 -p, --pid[=<file>]        unshare pid namespace
 -U, --user[=<file>]       unshare user namespace
 -C, --cgroup[=<file>]     unshare cgroup namespace
 -T, --time[=<file>]       unshare time namespace

 -f, --fork                fork before launching <program>
 --map-user=<uid>|<name>   map current user to uid (implies --user)
 --map-group=<gid>|<name>  map current group to gid (implies --user)
 -r, --map-root-user       map current user to root (implies --user)
 -c, --map-current-user    map current user to itself (implies --user)
 --map-auto                map users and groups automatically (implies --user)
 --map-users=<outeruid>,<inneruid>,<count>
                           map count users from outeruid to inneruid (implies --user)
 --map-groups=<outergid>,<innergid>,<count>
                           map count groups from outergid to innergid (implies --user)

 --kill-child[=<signame>]  when dying, kill the forked child (implies --fork)
                             defaults to SIGKILL
 --mount-proc[=<dir>]      mount proc filesystem first (implies --mount)
 --propagation slave|shared|private|unchanged
                           modify mount propagation in mount namespace
 --setgroups allow|deny    control the setgroups syscall in user namespaces
 --keep-caps               retain capabilities granted in user namespaces

 -R, --root=<dir>          run the command with root directory set to <dir>
 -w, --wd=<dir>            change working directory to <dir>
 -S, --setuid <uid>        set uid in entered namespace
 -G, --setgid <gid>        set gid in entered namespace
 --monotonic <offset>      set clock monotonic offset (seconds) in time namespaces
 --boottime <offset>       set clock boottime offset (seconds) in time namespaces

 -h, --help                display this help
 -V, --version             display version

For more details see unshare(1).

最新版本的使用文档可以参考:https://man7.org/linux/man-pages/man1/unshare.1.html

PID命名空间

$ sudo unshare --fork --pid --mount-proc bash
# ps aux
USER       PID %CPU %MEM    VSZ   RSS TTY      STAT START   TIME COMMAND
root         1  0.0  0.0   3952  3020 pts/0    S    22:47   0:00 bash
root         2  0.0  0.0   5644  2636 pts/0    R+   22:47   0:00 ps aux

可以看到,在新的shell中,已经无法看到父命名空间中的进程了。如果不加--fork参数,看到的进程列表会是当前系统中的全部进程。这是因为新的PID命名空间只在子进程中生效。

用户命名空间

$ ps aux | grep bash
root      303493  0.0  0.0   3952  3032 pts/3    S+   07:53   0:00 bash

在全局进程列表中可以看到,命名空间中的进程实际上也是以root权限执行的,存在一定的安全风险。

$ unshare --fork --pid --mount-proc --user bash
$ whoami
nobody

使用--user参数可以创建用户命名空间,并以普通用户权限进入命名空间中。但我们实际操作中更希望容器里面的用户是root权限,此时可以使用--map-root-user参数。

$ unshare --fork --pid --mount-proc --user --map-root-user bash
# id
uid=0(root) gid=0(root) groups=0(root),65534(nogroup)
# reboot
Failed to connect to bus: No data available
Failed to open initctl fifo: Permission denied
Failed to talk to init daemon.

使用--map-root-user参数可以将全局的普通用户映射为容器中的root用户,但并不是真正的全局root用户,因此无法访问那些只有全局root用户才能访问的资源。

Mount命名空间

前面的例子使用的都是宿主机上的操作系统,如果想使用不同的操作系统,可以通过Mount Namespace来实现。

假设现在ubuntu-20.04目录中已经有一个完整的Ubuntu系统了。

$ sudo unshare -R ubuntu-20.04 bash
root@drunkdream-LB0:/# cat /etc/os-release 
NAME="Ubuntu"
VERSION="20.04.4 LTS (Focal Fossa)"
ID=ubuntu
ID_LIKE=debian
PRETTY_NAME="Ubuntu 20.04.4 LTS"
VERSION_ID="20.04"
HOME_URL="https://www.ubuntu.com/"
SUPPORT_URL="https://help.ubuntu.com/"
BUG_REPORT_URL="https://bugs.launchpad.net/ubuntu/"
PRIVACY_POLICY_URL="https://www.ubuntu.com/legal/terms-and-policies/privacy-policy"
VERSION_CODENAME=focal
UBUNTU_CODENAME=focal

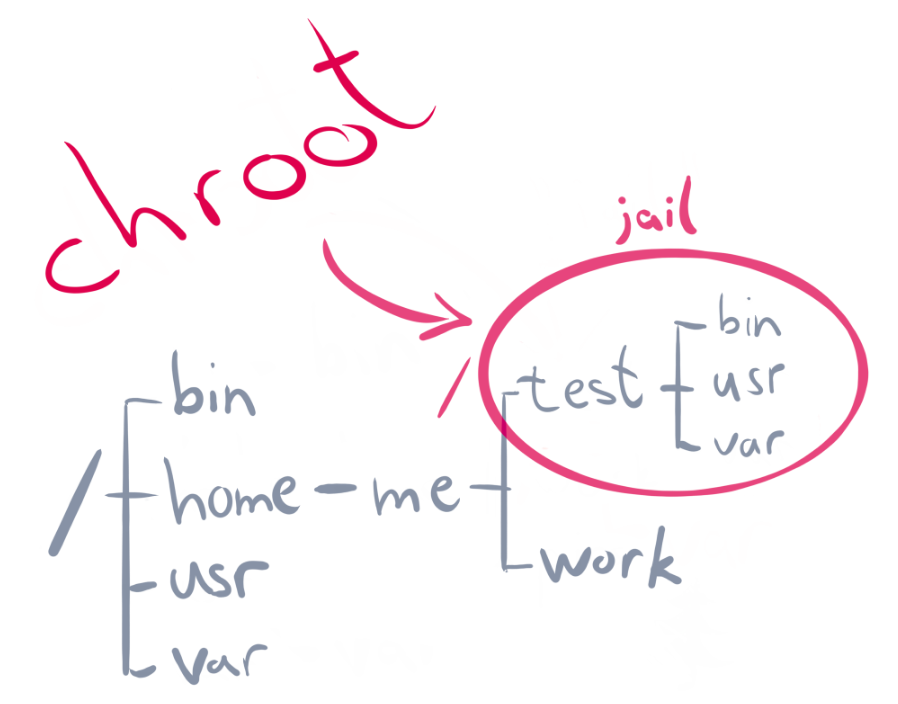
通过-R dir / --root=dir参数可以指定系统根目录。低版本的unshare可能不支持这个参数,可以使用sudo unshare sh -c 'chroot ubuntu-20.04 && bash'命令代替。
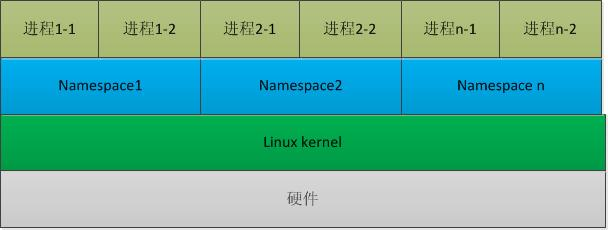
网络命名空间

使用ip netns命令可以进行网络命名空间的管理。

  • 创建命名空间

    $ sudo ip netns add netns1
    
  • 获取命名空间列表

    $ sudo ip netns ls        
    netns1
    $ ls -l /var/run/netns/netns1
    -r--r--r-- 1 root root 0 May 21 15:30 /var/run/netns/netns1
    $ sudo ./unshare -R ubuntu-20.04 --net=/var/run/netns/netns1 bash
    

    网络命名空间会存储在/var/run/netns目录下。

  • 在网路命名空间中执行命令

    $ sudo ip netns exec netns1 ip a
    1: lo: <LOOPBACK> mtu 65536 qdisc noop state DOWN group default qlen 1000
      link/loopback 00:00:00:00:00:00 brd 00:00:00:00:00:00
    
  • 启用网络设备

$ sudo ip netns exec netns1 ip link set lo up
$ sudo ip netns exec netns1 ip a
1: lo: <LOOPBACK,UP,LOWER_UP> mtu 65536 qdisc noqueue state UNKNOWN group default qlen 1000
    link/loopback 00:00:00:00:00:00 brd 00:00:00:00:00:00
    inet 127.0.0.1/8 scope host lo
       valid_lft forever preferred_lft forever
    inet6 ::1/128 scope host 
       valid_lft forever preferred_lft forever
  • 创建veth-pair

veth-pair是一对虚拟设备接口,和tap/tun设备不同的是,它都是成对出现的,一端连着协议栈,一端彼此相连着。

$ sudo ip link add veth1 type veth peer name veth2
$ sudo ip link set veth2 netns netns1
$ sudo ip netns exec netns1 ip link set veth2 up
$ sudo ip netns exec netns1 ip addr add 192.168.10.2/24 dev veth2
$ sudo ip link set veth1 up
$ sudo ip addr add 192.168.10.1/24 dev veth1
  • 配置路由转发
$ sudo ip netns exec netns1 ip route add default via 192.168.10.1 dev veth2
$ sudo iptables -A FORWARD -o veth1 -j ACCEPT
$ sudo iptables -A FORWARD -i veth1 -j ACCEPT
$ sudo iptables -t nat -A POSTROUTING -s 192.168.10.0/24 -o eth0 -j MASQUERADE

eth0需要替换成本机的实际网络接口

此时,容器内就可以访问外网了。

  • 与unshare相结合

unshare也提供了--net=/var/run/netns/netns1参数来创建网络命名空间,但是实际测试下来发现有些问题。所以比较保险的方案还是将sudo ip netns exec netns1unshare结合起来使用。

$ sudo ip netns exec netns1 unshare -R ubuntu-20.04 ip a
1: lo: <LOOPBACK,UP,LOWER_UP> mtu 65536 qdisc noqueue state UNKNOWN group default qlen 1000
    link/loopback 00:00:00:00:00:00 brd 00:00:00:00:00:00
    inet 127.0.0.1/8 scope host lo
       valid_lft forever preferred_lft forever
    inet6 ::1/128 scope host 
       valid_lft forever preferred_lft forever
29: veth2@if30: <BROADCAST,MULTICAST,UP,LOWER_UP> mtu 1500 qdisc noqueue state UP group default qlen 1000
    link/ether fe:2c:29:36:5c:9a brd ff:ff:ff:ff:ff:ff link-netnsid 0
    inet 192.168.10.2/24 scope global veth2
       valid_lft forever preferred_lft forever
    inet6 fe80::fc2c:29ff:fe36:5c9a/64 scope link 
       valid_lft forever preferred_lft forever

0x03 打造一个相对完整的容器

从上面的介绍来看,如果不需要用到网络虚拟化,是可以使用普通用户权限的。

使用普通用户权限创建不支持网络命名空间的容器

  • 新版本unshare

    $ unshare --fork --pid --mount-proc --mount --uts --ipc -R . --map-root-user bash
    bash-4.2# id
    uid=0(root) gid=0(root) groups=0(root),65534(nogroup)
    
  • 旧版本unshare

    $ unshare --fork --pid --mount-proc --mount --uts --ipc --user --map-root-user sh -c 'mount -o bind /proc proc && chroot .'
    bash-4.2# id
    uid=0(root) gid=0(root) groups=0(root),65534(nogroup)
    

使用root权限创建支持网络命名空间的容器

$ sudo ip netns exec netns1 unshare --fork --pid --mount-proc --mount --uts --ipc -R . --map-root-user bash

旧版本unshare方式不再赘述

在Ubuntu里使用apt时如果遇到下面这个错误:

root@drunkdream-LB0:/# apt update
E: setgroups 65534 failed - setgroups (1: Operation not permitted)
E: setegid 65534 failed - setegid (22: Invalid argument)
E: seteuid 100 failed - seteuid (22: Invalid argument)
E: setgroups 0 failed - setgroups (1: Operation not permitted)
Reading package lists... Done
W: chown to _apt:root of directory /var/lib/apt/lists/partial failed - SetupAPTPartialDirectory (22: Invalid argument)
W: chown to _apt:root of directory /var/lib/apt/lists/auxfiles failed - SetupAPTPartialDirectory (22: Invalid argument)
E: setgroups 65534 failed - setgroups (1: Operation not permitted)
E: setegid 65534 failed - setegid (22: Invalid argument)
E: seteuid 100 failed - seteuid (22: Invalid argument)
E: setgroups 0 failed - setgroups (1: Operation not permitted)
E: Method gave invalid 400 URI Failure message: Failed to setgroups - setgroups (1: Operation not permitted)
E: Method http has died unexpectedly!
E: Sub-process http returned an error code (112)

可以通过在进入容器后使用以下命令解决:

# apt-config dump | grep Sandbox::User
APT::Sandbox::User "_apt";
# cat <<EOF > /etc/apt/apt.conf.d/sandbox-disable
APT::Sandbox::User "root";
EOF
# apt-config dump | grep Sandbox::User
APT::Sandbox::User "root";

0x04 Linux容器技术——LXC

lxc是一种系统级容器,在使用体验上与传统的虚拟机差异不是很大。
lxc模板文件位于/usr/share/lxc/templates路径下,包含了绝大多数的Linux发行版。

$ ls /usr/share/lxc/templates
lxc-alpine     lxc-centos    lxc-fedora         lxc-oci           lxc-plamo      lxc-sparclinux    lxc-voidlinux
lxc-altlinux   lxc-cirros    lxc-fedora-legacy  lxc-openmandriva  lxc-pld        lxc-sshd
lxc-archlinux  lxc-debian    lxc-gentoo         lxc-opensuse      lxc-sabayon    lxc-ubuntu
lxc-busybox    lxc-download  lxc-local          lxc-oracle        lxc-slackware  lxc-ubuntu-cloud

创建lxc容器

$ sudo lxc-create -t ubuntu -n ubuntu-xenial

修改lx容器网络类型

默认的lxc容器网络是empty类型,只有lo网卡,不能访问外网。可以通过修改/var/lib/lxc/ubuntu-xenial/config文件中的lxc.net.0.type = emptylxc.net.0.type = none,来使用主机网络。

启动lxc容器

$ sudo lxc-start ubuntu-xenial

进入lxc容器

$ sudo lxc-attach ubuntu-xenial bash
root@ubuntu-xenial:/# cat /etc/lsb-release 
DISTRIB_ID=Ubuntu
DISTRIB_RELEASE=16.04
DISTRIB_CODENAME=xenial
DISTRIB_DESCRIPTION="Ubuntu 16.04.7 LTS"
root@ubuntu-xenial:/# ps aux
USER       PID %CPU %MEM    VSZ   RSS TTY      STAT START   TIME COMMAND
root         1  0.0  0.0  37236  5288 ?        Ss   23:51   0:00 /sbin/init
root        36  0.0  0.0  35276  5440 ?        Ss   23:51   0:00 /lib/systemd/systemd-journald
root        85  0.0  0.0  30720  2880 ?        Ss   23:51   0:00 /usr/sbin/cron -f
syslog      87  0.0  0.0 256396  3196 ?        Ssl  23:51   0:00 /usr/sbin/rsyslogd -n
root       124  0.0  0.0  17492  2180 console  Ss+  23:51   0:00 /sbin/agetty --noclear --keep-baud console 115200 38400 9600 
root       125  0.0  0.0  17492  2244 pts/2    Ss+  23:51   0:00 /sbin/agetty --noclear --keep-baud pts/2 115200 38400 9600 vt
root       126  0.0  0.0  17492  2172 pts/3    Ss+  23:51   0:00 /sbin/agetty --noclear --keep-baud pts/3 115200 38400 9600 vt
root       127  0.0  0.0  17492  2176 pts/1    Ss+  23:51   0:00 /sbin/agetty --noclear --keep-baud pts/1 115200 38400 9600 vt
root       128  0.0  0.0  17492  2236 pts/0    Ss+  23:51   0:00 /sbin/agetty --noclear --keep-baud pts/0 115200 38400 9600 vt
root       129  0.0  0.0  65516  5412 ?        Ss   23:51   0:00 /usr/sbin/sshd -D
root       137  0.0  0.0  18256  3256 ?        Ss   23:53   0:00 bash
root       149  0.0  0.0  34428  2796 ?        R+   23:54   0:00 ps aux

可以看出,想比于docker,lxc容器更接近于完整的Linux系统。

停止lxc容器

$ sudo lxc-stop ubuntu-xenial

删除lxc容器

$ sudo lxc-destroy ubuntu-xenial

0x05 容器技术的集大成者——Docker

Docker是一种应用级容器,倡导每个容器只包含一个主进程。同时,它提供了打包容器镜像的支持,从而大大降低了容器分发的成本,使得基于容器镜像的应用部署逐渐成为主流。可以说,Docker最大的贡献就是创造性地发明了容器镜像技术,并通过推动OCI(Open Container Initiative)标准,统一了镜像规范和运行时规范。

常见的Docker操作命令可以参考:https://www.drunkdream.com/2019/04/04/docker-command/

OCI 对容器 runtime 的标准主要是指定容器的运行状态,和 runtime 需要提供的命令。下面是容器状态转换图:

RunC是Docker提供的一个OCI运行时实现, 是从Docker的libcontainer中迁移而来,实现了容器启停、资源隔离等功能,可以作为容器运行时标准的参考实现。

除了RunC,还有KatagVisor等OCI实现。

containerd是一个上层的容器运行时,与RunC等底层容器运行时相比,它还包含了镜像管理等能力。

K8S也从1.23版本开始弃用Docker,改用containerd作为容器运行时。下图是改用containerd之后的基本架构。

0x06 容器技术的未来

RunC作为传统的容器运行时技术,由于与宿主机共享内核,一直存在着隔离性差的缺点。因此,以提升隔离性为目标的KatagVisor等新的容器运行时技术被开发出来。

Kata

Kata Containers开源项目于2017年底正式启动,其目标是将虚拟机(VM)的安全优势与容器的高速及可管理性相结合,为用户带来出色的容器解决方案。Kata的目标是开发面向云原生的虚拟化技术,也就是通过创建轻量级的虚拟机以提供像容器一样快同时又像虚拟机一样安全的容器。

gVisor

gVisor是Google开发的一款轻量级容器运行时,提供了更高的隔离性。与其它运行时使用虚拟机提升隔离性不同,它实现了一个用户层内核,通过拦截系统调用提供了强隔离边界。因此,gVisor更加轻量,资源占用更少。但对于少量应用程序可能存在兼容性问题。

0x07 参考文献

分享